A. Cabin Temperature Controls
Maintaining an optimal cabin temperature in all types of weather is critical to the
pleasure of your driving experience with your Alvarado/Bruno Roadster.
The XR-7 Electronic Interface gives you, the driver, complete command of your environment.
The cabin temperature controls are depicted in Figure 2 below.
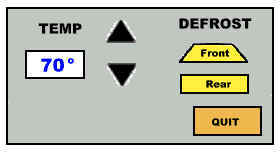
1) On the Driver Main Panel choose <CABIN TEMPERATURE>
2) Figure 2 will appear
3) To adjust the temperature:
A) The Temp window will display the current cabin temperature in the Fahrenheit scale
B) To increase the temperature press the upward pointing arrow (the temperature will
increase by 1 degree)
C) To decrease the temperature press the downward pointing arrow (the temperature will
decrease by 1 degree)
4) Defrost
A) The front and rear defrost functions are toggle buttons. If the button is lighted
then the toggle is activated.
B) To activate or deactivate the front or rear defrost just press the respective button
5) Quit - To exit the temperature control panel press <QUIT>
B. Stereo Sound System
Your Alvarado/Bruno Roadster comes equipped with a standard stereo
sound system consisting of an AM/FM radio for your listening pleasure. The most unique
features of this radio are the touch screen programming for your favorite radio stations
as well as touch screen capability for adjusting such options as the treble and the bass
to maximize your listening enjoyment. The primary interface control is show below.
The following are the steps to access and program your radio
stations:
1) On the Driver Main Panel choose <RADIO>
2) Figure 3 will appear
3) Press <PROGRAM> then the number of the button you wish to program <1-6>
4) Figure 4 below will appear
5) Enter the radio station number
6) Press <AM> / <FM1> / <FM2> (the button will be lighted to indicate it
is activated)
7) Press <QUIT>
8) The radio station is now programmed. You can access the station by pressing
<AM> / <FM1> / <FM2> (whichever you programmed) and the number
<1-6> on the primary interface or by stating the band and the number of the station
(voice activated).
The Alvarado/Bruno Roadster standard stereo sound system also has
touch screen adjustments to individualize the quality of the sound. These options include
adjustments for bass, treble, balance and fade. These touch screen adjustments are shown
below.
These touch screen adjustments allow the driver to glide their
finger over the panel to set the option to the desired level. When the desired level is
reached press <QUIT> to end the program. This easy-to-use system will make
adjusting your sound system to the optimal level easy and safe.
C. Lights
The XR-7 illumination system is also designed for ease-of-use and
adjustment. Figure 5 above depicts the illumination interface.
To access the lights interface do the following:
1) On the Driver Main Panel choose <LIGHTS>
2) Figure 5 will appear
3) To turn the lights On or Off touch <ON> or <OFF> (the button will be
lighted to indicate it is activated)
The interior light and panel light adjustments work exactly the same
as the adjustment options for the radio. Just glide your finger over the touch screen and
you can make either the interior light or panel light as dim or bright as you like.
Press <QUIT> to exit the lights interface.
D. Adjusting Outside Mirrors
One of the most inconvenient and dangerous tasks a driver must
perform is manually adjusting the outside mirrors. In particular, adjusting the right-side
mirror is difficult unless there is a person to assist in the adjustment. This is no
longer a problem with the XR-7 exterior mirrors adjustment system. The touch-screen
adjustment shown in Figure 6 allows the driver to use the convenient touch screen system
to adjust the mirrors for maximum visibility.
To access the outside mirrors adjustment interface do the following:
1) On the Driver Main Panel choose <EXTERIOR MIRRORS<
2) Figure 6 will appear
3) Choose which mirror you wish to adjust by choosing <LEFT> or <RIGHT> (the
option chosen will light up)
4) To adjust the mirror up, down, left or right press the arrow marked <UP>,
<DOWN>, <LEFT> or <RIGHT> until the mirror is adjusted for maximum
visibility
5) Press <QUIT> to exit the outside mirrors adjustment panel
E. Windshield Wipers
The windshield washer interface allows the driver to easily turn the
wipers on or off and to choose the exact speed for intermittent wiping. Figure 7 depicts
the windshield wiper interface.
To access the windshield washer adjustment interface do the
following:
1) On the Driver Main Panel choose <WINDSHIELD WIPERS>
2) Figure 7 will appear
3) To turn the wipers on press <ON> (the button will be lighted to indicate it is
activated)
4) To turn the wipers off press <OFF> (the button will be lighted to indicate it is
activated)
5) To adjust the speed of the wipers choose one of the following buttons (it will light up
to indicate it is activated)
A) Press <HIGH> to have the wipers at a constant high speed
B) Press <LOW> to have the wipers at a constant low speed
C) Press <INTERMITTENT> to have the wipers at an intermittent speed
Note: You can adjust the speed of the intermittent wipers by
touching the screen and moving your fingers over the blocks where the arrow is located.
Each block will light up to indicate it is activated. The further to the right you go, the
faster the intermittent speed will be.
|